This unit introduces some key ideas in residential design. You’ll start with an overview of wood frame construction used in most houses and residential structures. Good architects and engineers need to understand how buildings are built before they can design really cool structures. After that work, you’ll move on to your first look at Revit – our industry-level software for building design – where you’ll design a small utility shed. Finally, we’ll look at how engineers calculate the costs associated with building practices and structure heating/cooling.
When designing a residential structure like a house, storage shed, garage, or apartment; engineers and architects need to keep a few things in mind:
- The needs of the end user
- The space limitations of the design project
- The building codes in the local area
- The construction methods used by the builders
In this unit we’ll get to think mostly about structural design techniques used in residential buildings, and then get our first real work in Revit.
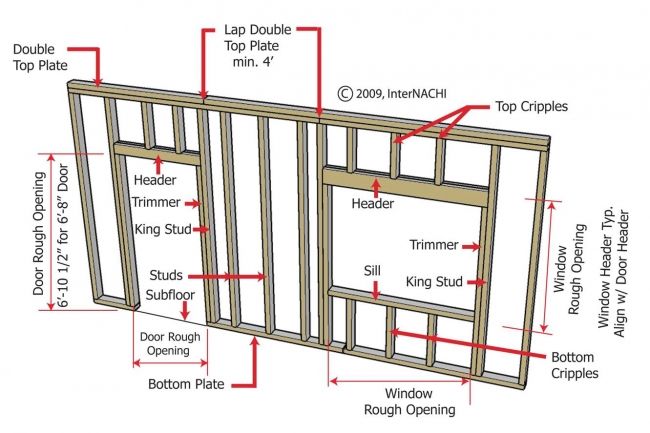
Framing Vocabulary Reference
The first part of our unit introduces the different systems used in wood frame residential construction. When contractors and carpenters build homes, they use a sturdy and reliable construction system that you’ll need to understand as an architect and civil engineer.
During this part of the unit, your job is to learn about the vocabulary and structures used in residential construction – including the construction of wood frames, roods, and wall systems.
GRADING & PROCESS
![]() Watch the three videos below on Wood Frame Systems, Residential Roof Types, and Residential Wall Types. Take a full page of notes on these ideas, including some pictures to help illustrate the residential structures described.
Watch the three videos below on Wood Frame Systems, Residential Roof Types, and Residential Wall Types. Take a full page of notes on these ideas, including some pictures to help illustrate the residential structures described.
![]() Using the balsa wood and pins available in our lab, create a model of residential construction. Label your model with the proper vocabulary!
Using the balsa wood and pins available in our lab, create a model of residential construction. Label your model with the proper vocabulary!
![]() Complete the Structures Assignment either on the handout or in your engineering notebook.
Complete the Structures Assignment either on the handout or in your engineering notebook.
Wood Frame Systems
Residential Roof Types
Residential Wall Types
Real civil engineers and architects use Revit as a design tool to make real-world plans for homes and buildings of all kinds. This part of the unit is meant to give you a chance to really dig in to some of the key parts of Revit like walls, doors, windows, floors, roofs, etc. Here you’ll plan and design a small utility shed in Revit. As you work through this part of the unit, take good notes because you’ll use the same tools and procedures to design full houses in our upcoming projects!
Also make sure to take the Unit 2 Quiz by the due date!
GRADING & PROCESS
![]() Review the Utility Shed Construction Example presentation and take some notes on what needs to go into it. Then, continue taking notes and learning Revit as you start your Utility Shed project and watch the four Utility Shed in Revit videos.
Review the Utility Shed Construction Example presentation and take some notes on what needs to go into it. Then, continue taking notes and learning Revit as you start your Utility Shed project and watch the four Utility Shed in Revit videos.
![]() Follow the paraemeters in your handout to create a Utility Shed in Revit. Read the nine parameters and make sure that your design fits all the criteria.
Follow the paraemeters in your handout to create a Utility Shed in Revit. Read the nine parameters and make sure that your design fits all the criteria.
![]() Take the Unit 2 Quiz before September 20!
Take the Unit 2 Quiz before September 20!
![]() Have Mr. Benshoof check-off your complete Revit model
Have Mr. Benshoof check-off your complete Revit model
Utility Shed in Revit 1
Utility Shed in Revit 2
Utility Shed in Revit 3
Utility Shed in Revit 4
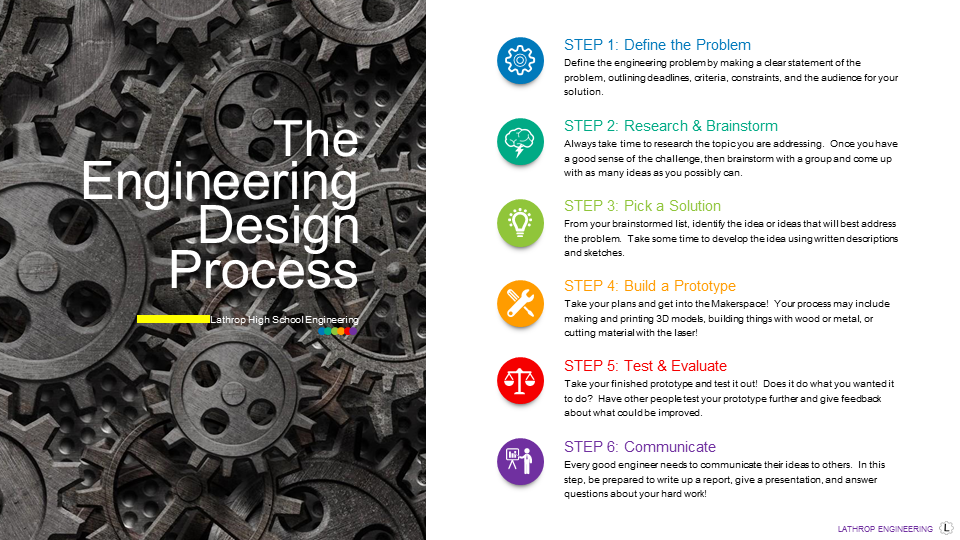
Engineering Design Process Overview
The final step to completing the engineering design process is to share your work with other people and evaluate your potential success. As we finish this up, you’ll load your mini-essays into the Arctic innovation Challenge website. Then you’ll learn about what a decision matrix is and create one to evaluate your own idea. Have two classmates not from your design team evaluate your idea and record their feedback. Then, have each person in your design team create an Autodesk model of what your product will look like.
GRADING & PROCESS
![]() Upload your responses to the Arctic Innovation Design Competition website in the Junior Division!
Upload your responses to the Arctic Innovation Design Competition website in the Junior Division!
![]() Create an evaluation matrix in your engineering notebook to evaluate the success of your product
Create an evaluation matrix in your engineering notebook to evaluate the success of your product
![]() Find two people that aren’t in your design group to evaluate your idea using your evaluation matrix. Record their feedback in your engineering notebook.
Find two people that aren’t in your design group to evaluate your idea using your evaluation matrix. Record their feedback in your engineering notebook.
![]() Create an Autodesk model of your proposed solution. Each person in your group should make their own model – they might not all be exactly the same, and that’s okay.
Create an Autodesk model of your proposed solution. Each person in your group should make their own model – they might not all be exactly the same, and that’s okay.
Concrete Pad Estimation
Heat Loss & Gain
Part 1 Resources
Part 2 Resources