This unit will give us an introduction to how to use Autodesk, different kinds of sketching used in engineering, and how to use the tools in our Makerspace safely to build a simple model. A BlockPerson is:
- A simple model of a person using rectangular blocks
- A model made in the computer, drawn in your notebook, and built in the Makerspace
Your Block Person will be special because you get to make it however you want, and when you’re finished you’ll have two models of different sizes that should be proportionally the same. As you build your models, you’ll go through three major steps:
- STEP 1: Use Autodesk to build a computer model of a person out of rectangular prisms & 3D Print your model.
- STEP 2: Use Autodesk diagrams, isometric, multiview, and perspective sketching to draw your model into your notebook.
- STEP 3: Learn how to safely use the tools in our Makerspace, and use them to create a wooden version of your Block Person.
When you’re done, you’ll have two physical models and multiple diagrams of your model!
Working in Autodesk Overview
Autodesk Inventor Reference
The first part of our design process will happen in a program called Autodesk Inventor. Autodesk Inventor is a program like Google Sketchup that you can use to make 3D models. As you get more and more practice with it, you’ll be able to make some very impressive models or custom pieces for your robots. Once you’ve designed your 3D part in Autodesk, we will then use our 3D printers to print a model of it that we can continue to use in the rest of the project.
As you work, the key to success with Autodesk is PATIENCE
GRADING & PROCESS
![]() Review the three “Getting Started with Autodesk” videos below, and take some careful notes in your Engineering Notebook. Autodesk is a confusing program at times, so some careful notes will make all the difference!
Review the three “Getting Started with Autodesk” videos below, and take some careful notes in your Engineering Notebook. Autodesk is a confusing program at times, so some careful notes will make all the difference!
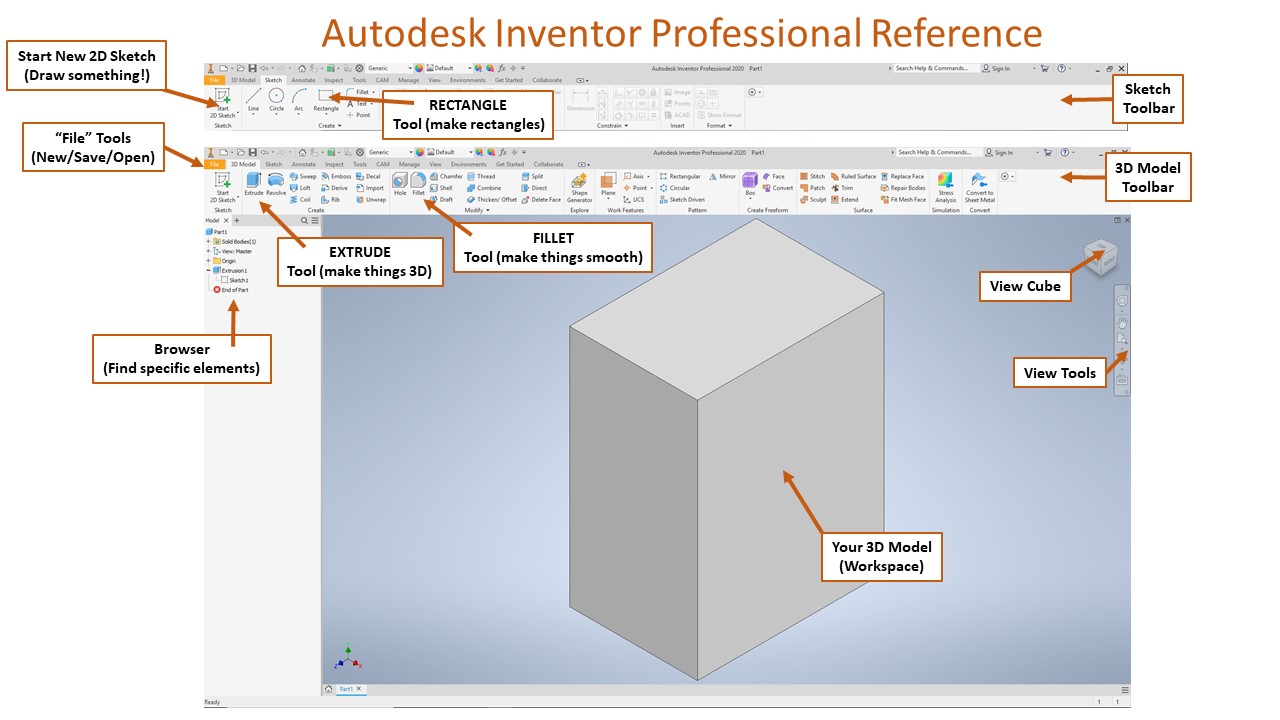
![]() Check out the “Autodesk Inventor Reference” image to help point out the most important buttons for getting started in Autodesk!
Check out the “Autodesk Inventor Reference” image to help point out the most important buttons for getting started in Autodesk!
![]() Make a few models in Autodesk using rectangular prisms to practice how to use the program.
Make a few models in Autodesk using rectangular prisms to practice how to use the program.
![]() Build your Ms. BlockWoman or Mr. BlockMan in Autodesk by following the assignment guide. Remember that whatever you make in Autodesk you’ll later need to build in the Makerspace.
Build your Ms. BlockWoman or Mr. BlockMan in Autodesk by following the assignment guide. Remember that whatever you make in Autodesk you’ll later need to build in the Makerspace.
![]() Complete the Volume Assignment to practice some simple engineering math!
Complete the Volume Assignment to practice some simple engineering math!
![]() Have Mr. Benshoof approve your Ms. BlockWoman or Mr. BlockMan, then export the .STL and 3D print your model!
Have Mr. Benshoof approve your Ms. BlockWoman or Mr. BlockMan, then export the .STL and 3D print your model!
Single Block Models
Multi-Block Models
Exporting an .STL File for 3D Printing
Block Person Sketching Overview
A big part of engineering and the communication of ideas is to have really good diagrams and sketches of your work. In this second part, you will create a total of 4 depictions of your Ms. BlockWoman/Mr. BlockMan design. The first will be made in Autodesk, and the other three will be drawn by hand using three sketching techniques: isometric, multiview, and perspective.
Each of your drawings and sketches should be done carefully and include labels!
GRADING & PROCESS
![]() Watch the video on making an Autodesk diagram. Then use Autodesk to create a diagram of your model using multiple perspectives. Be sure to add dimension labels! Print this, fold it, and tape it into your engineering notebook.
Watch the video on making an Autodesk diagram. Then use Autodesk to create a diagram of your model using multiple perspectives. Be sure to add dimension labels! Print this, fold it, and tape it into your engineering notebook.
![]() Watch the video on isometric sketching. Use a ruler and some isometric graph paper to carefully sketch your model. Be sure to add some labels. Make a few attempts at the sketch, choose the best one, and cut-and-tape it into your engineering notebook.
Watch the video on isometric sketching. Use a ruler and some isometric graph paper to carefully sketch your model. Be sure to add some labels. Make a few attempts at the sketch, choose the best one, and cut-and-tape it into your engineering notebook.
![]() Watch the video on multiview sketching. Use a ruler and draw a multiview sketch of your model directly into your engineering notebook. Your drawing should be careful and precise, and should include at least 3 views of the model.
Watch the video on multiview sketching. Use a ruler and draw a multiview sketch of your model directly into your engineering notebook. Your drawing should be careful and precise, and should include at least 3 views of the model.
![]() Watch the video on perspective sketching. Use a ruler and draw a 1 point linear perspective drawing of your model directly into your engineering notebook. Your drawing should be careful, and might take a few practice attempts on scratch paper.
Watch the video on perspective sketching. Use a ruler and draw a 1 point linear perspective drawing of your model directly into your engineering notebook. Your drawing should be careful, and might take a few practice attempts on scratch paper.
![]() Take the Unit 2 Quiz on Autodesk and Sketching by clicking on this link!
Take the Unit 2 Quiz on Autodesk and Sketching by clicking on this link!
![]() Have Mr. Benshoof approve all four of your diagrams & drawings before moving on!
Have Mr. Benshoof approve all four of your diagrams & drawings before moving on!
Autodesk Sketching
Multiview Sketching
1-Point Perspective Sketching
Isometric Sketching
We will spend a lot of time this year building prototypes and models in our Makerspace. We have a lot of great tools for working with many different materials, and you’ll get the chance to learn how to use them all over the course of the year. For this part of our project, we’ll focus on the wood-working tools (saws, drills, hand tools). You’ll start by learning some safety information and taking safety quizzes, then you’ll go ahead and build a wooden model of your Ms. BlockWoman/Mr. BlockMan.
REMEMBER: You must pass all safety quizzes before using any tools in the Makerspace! No exceptions!
GRADING & PROCESS
![]() Watch the safety videos for (1) Handtools, (2) Saws, (3) Drills, and (4) Sanders. Take notes in your notebook as suggested, and ask questions about safe use.
Watch the safety videos for (1) Handtools, (2) Saws, (3) Drills, and (4) Sanders. Take notes in your notebook as suggested, and ask questions about safe use.
![]() Take the safety quizzes for each group of tools. You must get 100% on each quiz in order to be approved to use the Makerspace.
Take the safety quizzes for each group of tools. You must get 100% on each quiz in order to be approved to use the Makerspace.
![]() Watch the “Making Your Model” video and then make a plan for how you are going to build your Ms. BlockWoman/Mr. BlockMan. What wood will you need? How big will it be? What tools will you use? How will you connect everything?
Watch the “Making Your Model” video and then make a plan for how you are going to build your Ms. BlockWoman/Mr. BlockMan. What wood will you need? How big will it be? What tools will you use? How will you connect everything?
![]() Build your model in the MakerSpace!
Build your model in the MakerSpace!
![]() If you have extra time, decorate your Ms. BlockWoman/Mr. BlockMan with paint or other details!
If you have extra time, decorate your Ms. BlockWoman/Mr. BlockMan with paint or other details!
Hand Tool Safety
Drill Safety
Saw Safety
Sander Safety
Part 1 Resources
Part 2 Resources