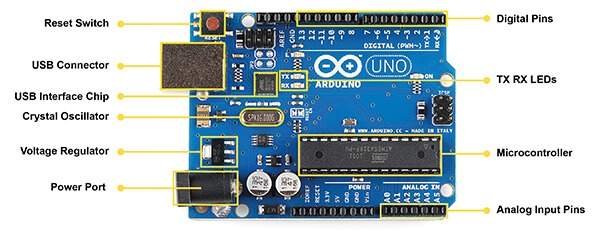
Arduino Detail Image
This unit is all about digital electronics and a device called an Arduino. An Arduino is a small programmable microcontroller that can be used to control lights, motors, servos, and other electronic components. When tackling a problem with electronics, an Arduino lets you:
- Build a system with lights, sensors, motors, or servos
- Write a program that takes inputs and controls outputs
Here, we get to learn how to build simple circuits and control them with an Arduino. We’ll start with the basics, build some more interesting and complex circuits, and then create our own small Arduino project. As we work through our Arduino challenges, we’ll go through three main parts:
- STEP 1: Watch the Introduction to Arduino, build a simple circuit, and get your first two programs running.
- STEP 2: Tackle the Arduino Challenges to learn new functions with Arduinos and the Arduino programming language.
- STEP 3: Design and build a small Arduino project: make something cool.
When you’re done you will have seen our 5th programming language of the year, and will have learned the basics of circuits and working with Arduino.
Arduino Introduction
The first part of any new system is to get something simple working. In this quick part of our unit we’ll get our first Arduino circuit built, attach it to the computer, and upload a pre-built program. This will help us make sure that everything is working before we change it to make our second simple Arduino program.
GRADING & PROCESS
![]() Take a page of notes as you watch the Arduino Introduction video and the First Arduino Program
Take a page of notes as you watch the Arduino Introduction video and the First Arduino Program
![]() Build and program the first and second Arduino projects described in the space below. (Be sure to check your port!)
Build and program the first and second Arduino projects described in the space below. (Be sure to check your port!)
![]() Have Mr. Benshoof confirm that your projects are working properly!
Have Mr. Benshoof confirm that your projects are working properly!
FIRST & SECOND Arduino Projects:
The first Arduino Project for you to tackle requires turning a light bulb ON! Build the circuit below, then copy the proper code into Arduino!

CHALLENGE 1: Turn on a light. (Copy-Paste this!)
void setup()
{
pinmode( 7, OUTPUT );
}
void loop()
{
digitalWrite( 7, HIGH);
}
CHALLENGE 2: Make an LED blink (Copy-Paste this!)
void setup()
{
pinmode( 7, OUTPUT );
}
void loop()
{
digitalWrite( 7, HIGH);
delay(3000);
digitalWrite( 7,LOW);
delay(3000);
}
Here you’ll find 13 small Arduino challenges that start relatively simple and build in complexity as you keep working. Start with the first one, and work through them one-at-a-time until you get it working correctly. Each of these challenges increases in difficulty in a reasonable way – some will have you keep the same program just add new parts to the circuit, while others will ask you to keep the circuit the same but change the program in a way. Work through each challenge, take notes as you work, and ask Mr. Benshoof when you have questions!
GRADING & PROCESS
![]() Complete at least the first 8 Arduino challenges below
Complete at least the first 8 Arduino challenges below
![]() Additional notes on Arduino & Arduino programming as you work through challenges
Additional notes on Arduino & Arduino programming as you work through challenges
![]() Have Mr. Benshoof confirm each of your working challenges!
Have Mr. Benshoof confirm each of your working challenges!
1) Blinking LED
Use the same circuit from the Part 1 challenges. Now we’ll make that light blink! To do that, change your program from before to look like this new one:
2) LED Traffic Light
Add on to your circuit to include a total of three lights: one green, one yellow, and one red (a wiring diagram is below). Then add to your program to make the lights turn on and off like a traffic light.
3) LED Light Bar
Pick any 8 lights (any colors) and create a row of 8 individually controllable lights. (One light per input/output pin). Then, create a progarm taht can turn ON all 8 lights at once.
4) LED Color Cycler
Keep your 8-light light bar in place. Change your program so that the lights turn on one-at-a-time from left to right. When the last one truns off, the pattern should start back over.
5) LED Night Rider
Keep your 8-light light bar in place. Add to your program so that the lights turn on one at a time from left-to-right, but then the light bounces back from right-to-left. The light should continue to bounce back and forth like a ping-pong game.
6) LED Randomizer
Keep your 8-light light bar in place. Change the program so that only one light turns on at a time, but that light should be randomly chosen. After a second, the light should turn off, and then a new random light should turn on. This pattern shoud continue indefinitely.
HINT: To turn on a random light (in pins 3-11), you can use this line of code:
digitalWrite( randomInt(3,12) , HIGH);
7) LED Heart Beat
Use one of the PWM ports (with the little squiggle ~ symbol) to make a light glow brighter and dimmer like a heartbeat. You shouldn’t have to build anything really new, but instead you’ll just copy the code below into your Arduino loop:
for(int x = 0 ; x<256 ; x++)
{
analogWrite( 6 , x );
}
for(int x = 255 ; x>0; x–)
{
analogWrite( 6 , x );
}
8) LED Matching Heartbeats
Keep your heartbeat circuit together, but make sure you now have two (2) lights plugged in to PWM ports. The PWM ports are the ones with the squiggle next to them, like ~3, ~5, ~6, ~9, ~10, ~11. Then, add to your program to make two lights alternate between growing brighter and dimmer like alternating heartbeats.
9) LED Back-and-Forth
Rebuild your circuit so that you have two rows of 3 LEDs each. Then, create a program that turns ON one of the rows while the other is OFF. The program should then switch rows and turn the first one OFF while turning the second one ON. This pattern should continue to alternate back and forth.
10) LED Rock-Paper-Scissors
Keep your two rows of 3 LEDs together, but now label them rock, paper, and sissors so that you have two complete sets. Next, make your two light groups play Rock-Paper-Scissors against each other. The order of a game should be as follows:
1). ALL 6 lights blink on-off-on-off-on-off (sort of like a “1-2-3” lead-up)
2). ONE light in each group should be randomly turned ON to indicate the choice of that side.
3) The winning side should blink all their lights on-off-on-off-on to indicate their victory.
4) All lights thould turn off.
11) Push Button Light Switch
Follow the diagram and code example below to make a push button light up an LED when pressed.
12) Push Button Toggle
Keep your push button circuit assembled. Now, change the program so that the button toggles the state of the light. Pushing the button should. turn the light on (even when you let the button go). Then, pushing the button again should switch the light off.
13) Push Button Counter
Keep your circuit from the push button toggle together, but add a few more lights (so that you have a total of 5 individually controllable lights). Then, redesign your program so that the button turns on more and more lights. The lights should all start OFF, but then when you push the button, a single light should turn ON. Pushing the button again should turn on a SECOND light. Pushing the button again should turn on the third light, etc.
How to Build your ArduinoBot!
For the last part of this unit, you get to build a small robot controlled by an Arduino! This ArduinoBot takes some time and effort to wire together correctly, but once it’s working you’ll be able to program it to drive like you want.
Remember, you’ll also get to KEEP your ArduinoBot, so make it something cool and awesome so you’re proud of your work and happy to take it home.
GRADING & PROCESS
![]() DRAW a picture of the wiring diagram in your engineering notebook
DRAW a picture of the wiring diagram in your engineering notebook
![]() Follow the ArduinoBot assembly video carefully to build your ArduinoBot
Follow the ArduinoBot assembly video carefully to build your ArduinoBot
![]() Get your ArduinoBot moving
Get your ArduinoBot moving
![]() Complete the THREE ArduinoBot Challenges
Complete the THREE ArduinoBot Challenges
![]() Have Mr. Benshoof check-off your completed project.
Have Mr. Benshoof check-off your completed project.
Part 1 Resources
Part 2 Resources
Part 3 Resources