One of the biggest tools that we’ll learn to use in our course this year is Autodesk Inventor Professional. This software – and others just like it – are used in the engineering field to design and create 3-dimensional models just like with our puzzle cube. The great thing about Autodesk is it lets us make very precise and complex shapes, and then even see them working together. Our serious work with Autodesk this semester will focus on:
- Modeling with sketches, extrusions, holes, fillets, and chamfers
- Modeling with geometric constraints
- Using Autodesk to estimate the properties of objects
- Creating assemblies with various constraints
The Autodesk skills that we work on here will give you all the tools you need to design your own custom 3-dimensional parts. In our class you’ll get to design a few specific projects, but you’ll also be able to use this to design cool things of your choice. This unit will have three main parts:
- STEP 1: Complete the tutorials on creating simple sketches, extrusions, and other basic Autodesk functions – these are what you’ll use most when creating your 3-dimensional models.
- STEP 2: Complete the tutorial on geometric constraints and object properties.
- STEP 3: Use Autodesk and a caliper to model every part of your chosen Automoblox car – including the wheels and tires, windshield, axles, and main body blocks. When they’re all finished, follow the tutorial to assemble your car in Autodesk!
When you’re done with this unit, you’ll be an Autodesk Master! Autodesk has a lot of tools built into it, and the only way to get really good at them is to practice. This unit is all about practicing Autodesk and using the tools to create a precise copy of an Automoblox car.
To get started with more difficult 3-dimensional models, we need to get learn the basics of some key features in Autodesk. We’ll start by reviewing what it takes to make a good sketch, and the options we have to extrude those sketches. Next we’ll get a chance to see how the hole, fillet, and chamfer tools work to make special modifications to an Autodesk part. By combining these different tools, you’ll be able to make almost any Autodesk part!
GRADING & PROCESS
![]() Watch the presentation on sketches and extrusions and take some careful notes
Watch the presentation on sketches and extrusions and take some careful notes
![]() Watch the video about holes, fillets, and chamfers and take a page of careful notes
Watch the video about holes, fillets, and chamfers and take a page of careful notes
![]() Complete the Autodesk Basics tutorial and build the Part Cube
Complete the Autodesk Basics tutorial and build the Part Cube
![]() Have Mr. Benshoof confirm your notes and your correct Part Cube
Have Mr. Benshoof confirm your notes and your correct Part Cube
Sketches & Extrusions
Holes, Fillets & Chamfers
Part Cube (Sketch-Plane Cube)
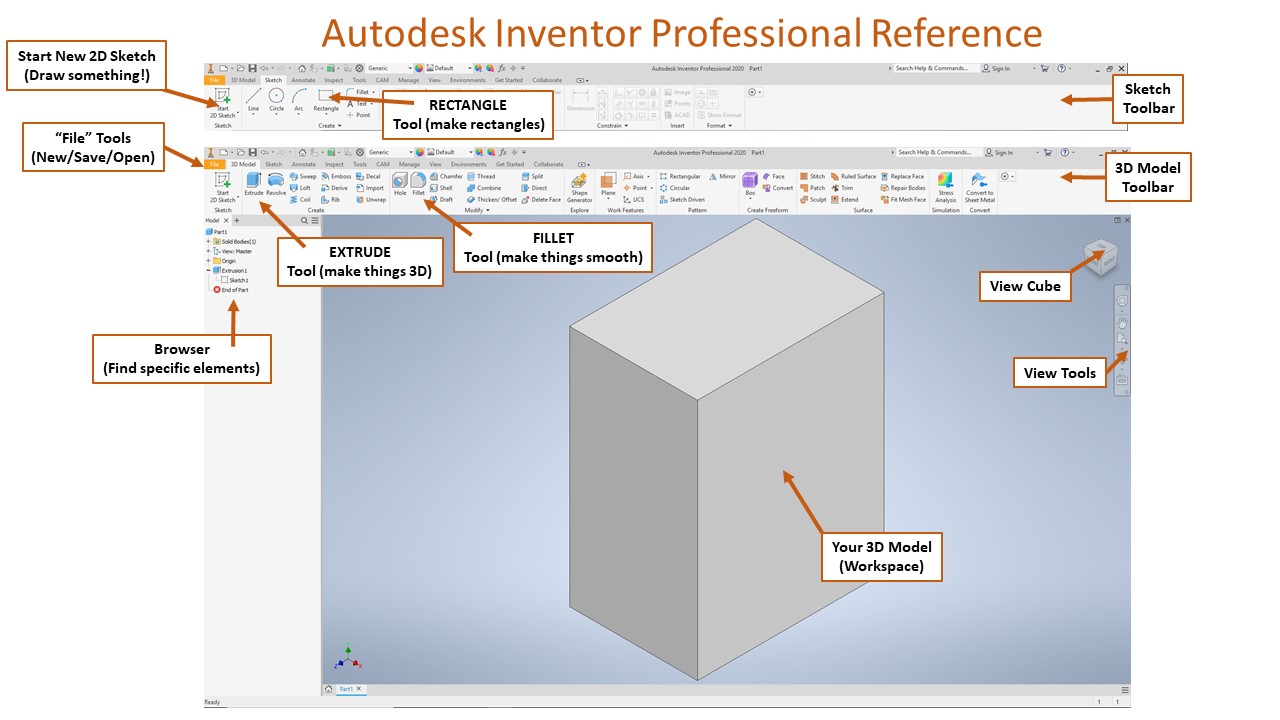
Autodesk Reference
Now that we’ve looked at the details of creating Autodesk parts, we want to give ourselves a new tool for refining those parts. Geometric constraints help make your sketches more precise, and can also help you build your sketches and models more quickly. In this part, you’ll complete some notes and a tutorial about the various constraints available in Autodesk. Then, we’ll take a moment to look at the iProperties tab in Autodesk and see how this can help us understand the geometry of complex parts.
GRADING & PROCESS
![]() Watch the video on geometric constraints and take a page of notes in your engineering notebook
Watch the video on geometric constraints and take a page of notes in your engineering notebook
![]() Complete the Geometric Constraints tutorial and print your result
Complete the Geometric Constraints tutorial and print your result
![]() Complete the iProperties tutorial using the Part Cube
Complete the iProperties tutorial using the Part Cube
![]() Take the Unit 5 Quiz
Take the Unit 5 Quiz
![]() Have Mr. Benshoof confirm your notes and tutorials
Have Mr. Benshoof confirm your notes and tutorials
Geometric Constraints
Geometric Constraints Tutorial
iProperties
One of the jobs of engineers is to reverse-engineer products that have already been made. Next semester we will look in more detail at what reverse engineering entails, but right now we get to focus on the re-building of a complex object: an Automoblox Car. In this last part of the unit, your job is to carefully measure and create every part from your Automoblox car. When you’re finished, you’ll be able to create an assembly of the car right in Autodesk!
GRADING & PROCESS
![]() Review the Automoblox Re-Creation overview and briefly sketch your Automoblox car; be sure to include a list of all the parts that need to be modeled.
Review the Automoblox Re-Creation overview and briefly sketch your Automoblox car; be sure to include a list of all the parts that need to be modeled.
![]() Create Autodesk parts of each piece from your Automoblox car.
Create Autodesk parts of each piece from your Automoblox car.
![]() Follow the Tutorial to create a complete assembly of your car in Autodesk.
Follow the Tutorial to create a complete assembly of your car in Autodesk.
![]() Have Mr. Benshoof confirm your Autodesk parts and final assembly.
Have Mr. Benshoof confirm your Autodesk parts and final assembly.
Automoblox Body Example
Automoblox Windshield Example
Automoblox Assembly Example
Part 1 Resources
Part 2 Resources