As we continue to put the details into our Habitat for Humanity House (started last unit), the job turns to details such as the foundation, electrical, and plumbing systems. All houses need to have a strong foundation to make sure they don’t settle, sink, or become unstable: here we’ll look at how different foundations work and how we can add a foundation to our Revit model.
We also need to look at electrical and plumbing systems. Both of these systems have special fixtures, furniture, and appliances that we’ll need to drop into our house. We also need to consider where wires and pipes will need to go and make a plan for an efficient layout for these systems as well.
This unit continues the work you started on your Habitat for Humanity House, and will give you a chance to see the final touches on your Revit design make your home look cool and complete!
The first part of our unit looks at both the foundation of your house as well as its electrical system. The foundation helps keep the building stable in a variety of ways, and we’ll start by investigating different types of residential foundations. When you get back into Revit, we’ll add a very simple foundation to your Habitat for Humanity house so that it is ready to be set into the ground!
The second half of this first part looks at electrical systems. We’ll think about different planning considerations like ‘where will the lights go?’, ‘how many wall-plug-ins do we want?’, and ‘where will the wires go?’. Then you’ll get some time to add some basic fixtures, lights, and furniture to start making your house look like a house! We’ll also create an annotated drawing of where the wiring will go for all the lights and light switches.
GRADING & PROCESS
![]() Watch the Residential Foundations and Foundations in Revit presentations and take a full page of notes on them!
Watch the Residential Foundations and Foundations in Revit presentations and take a full page of notes on them!
![]() Get back to your Revit design for your Habitat for Humanity House and add a foundation in the manner shown in the video (it’s a quick thing)
Get back to your Revit design for your Habitat for Humanity House and add a foundation in the manner shown in the video (it’s a quick thing)
![]() Watch the Planning for Electrical and Electrical in Revit presentations and take a full page of notes on them!
Watch the Planning for Electrical and Electrical in Revit presentations and take a full page of notes on them!
![]() Get back to your Revit design for your Habitat for Humanity House and addelectrical fixtures and ewiring
Get back to your Revit design for your Habitat for Humanity House and addelectrical fixtures and ewiring
Foundations in Revit
Planning for Electrical
Electrical in Revit
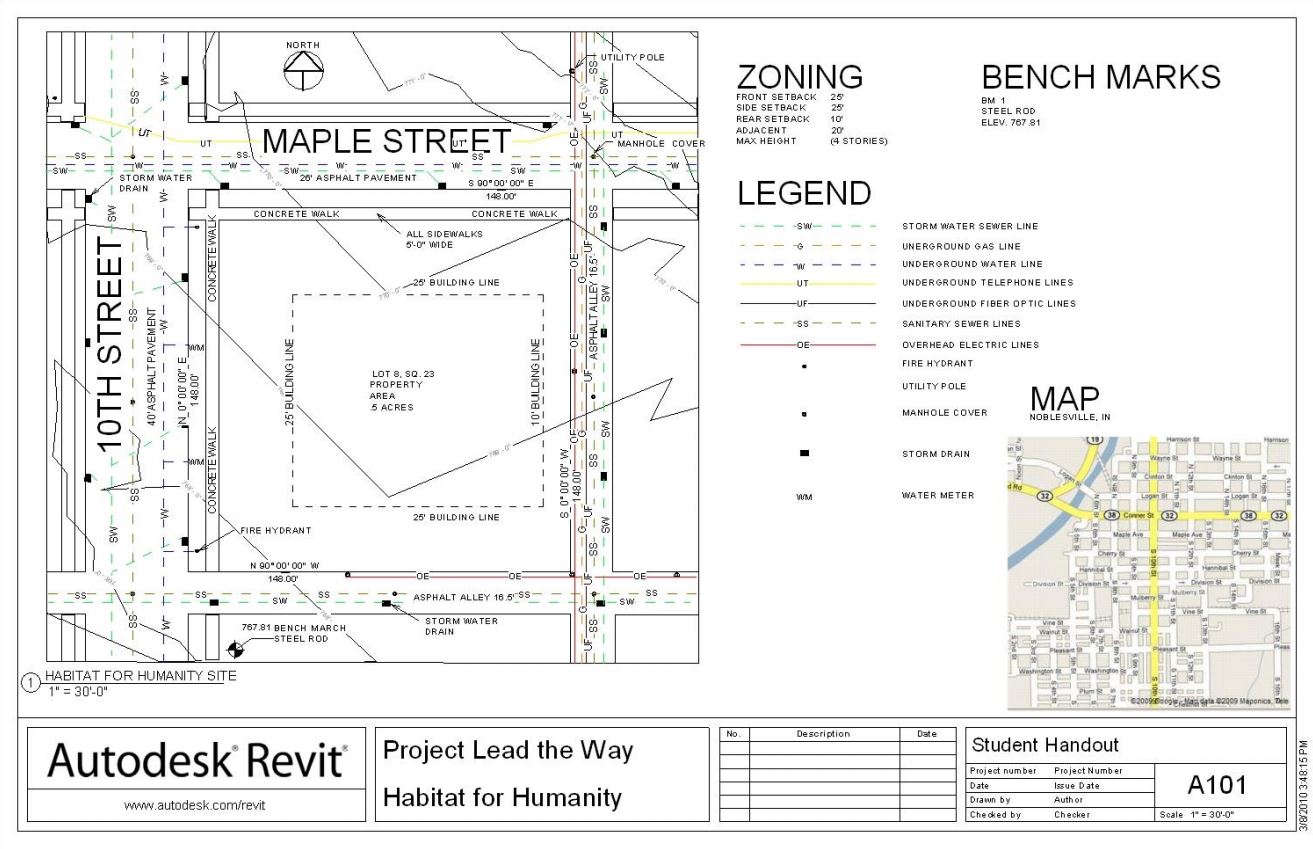
Example Site Plan
Our next job is to consider where the building we designed should go. Good architects consider the landscape in their designs, and civil engineers are required to follow a variety of building codes and zoning regulations when positioning their designs. In this part of the unit we get to think about the site plan
GRADING & PROCESS
![]() Take a full page of notes on the first three videos about site plans and site planning in Revit
Take a full page of notes on the first three videos about site plans and site planning in Revit
![]() Follow the parameters in your rubric and the downloadable site plan to add your Habitat for Humanity home to the site plan and think abouyt where it should be built!
Follow the parameters in your rubric and the downloadable site plan to add your Habitat for Humanity home to the site plan and think abouyt where it should be built!
![]() Take a full page of notes on the second group of three videos about water supplies and plumbing.
Take a full page of notes on the second group of three videos about water supplies and plumbing.
![]() Follow the parameters in your rubric to add plumbing fixtures and annotated plumbing systems to your Habitat for Humanity design.
Follow the parameters in your rubric to add plumbing fixtures and annotated plumbing systems to your Habitat for Humanity design.
![]() Have Mr. Benshoof check-off your complete site plan and fully plumbed house!
Have Mr. Benshoof check-off your complete site plan and fully plumbed house!
Site Plan Considerations
Site Plan Requirements
Site Plans in Revit
Water Supply
Plumbing
Plumbing in Revit
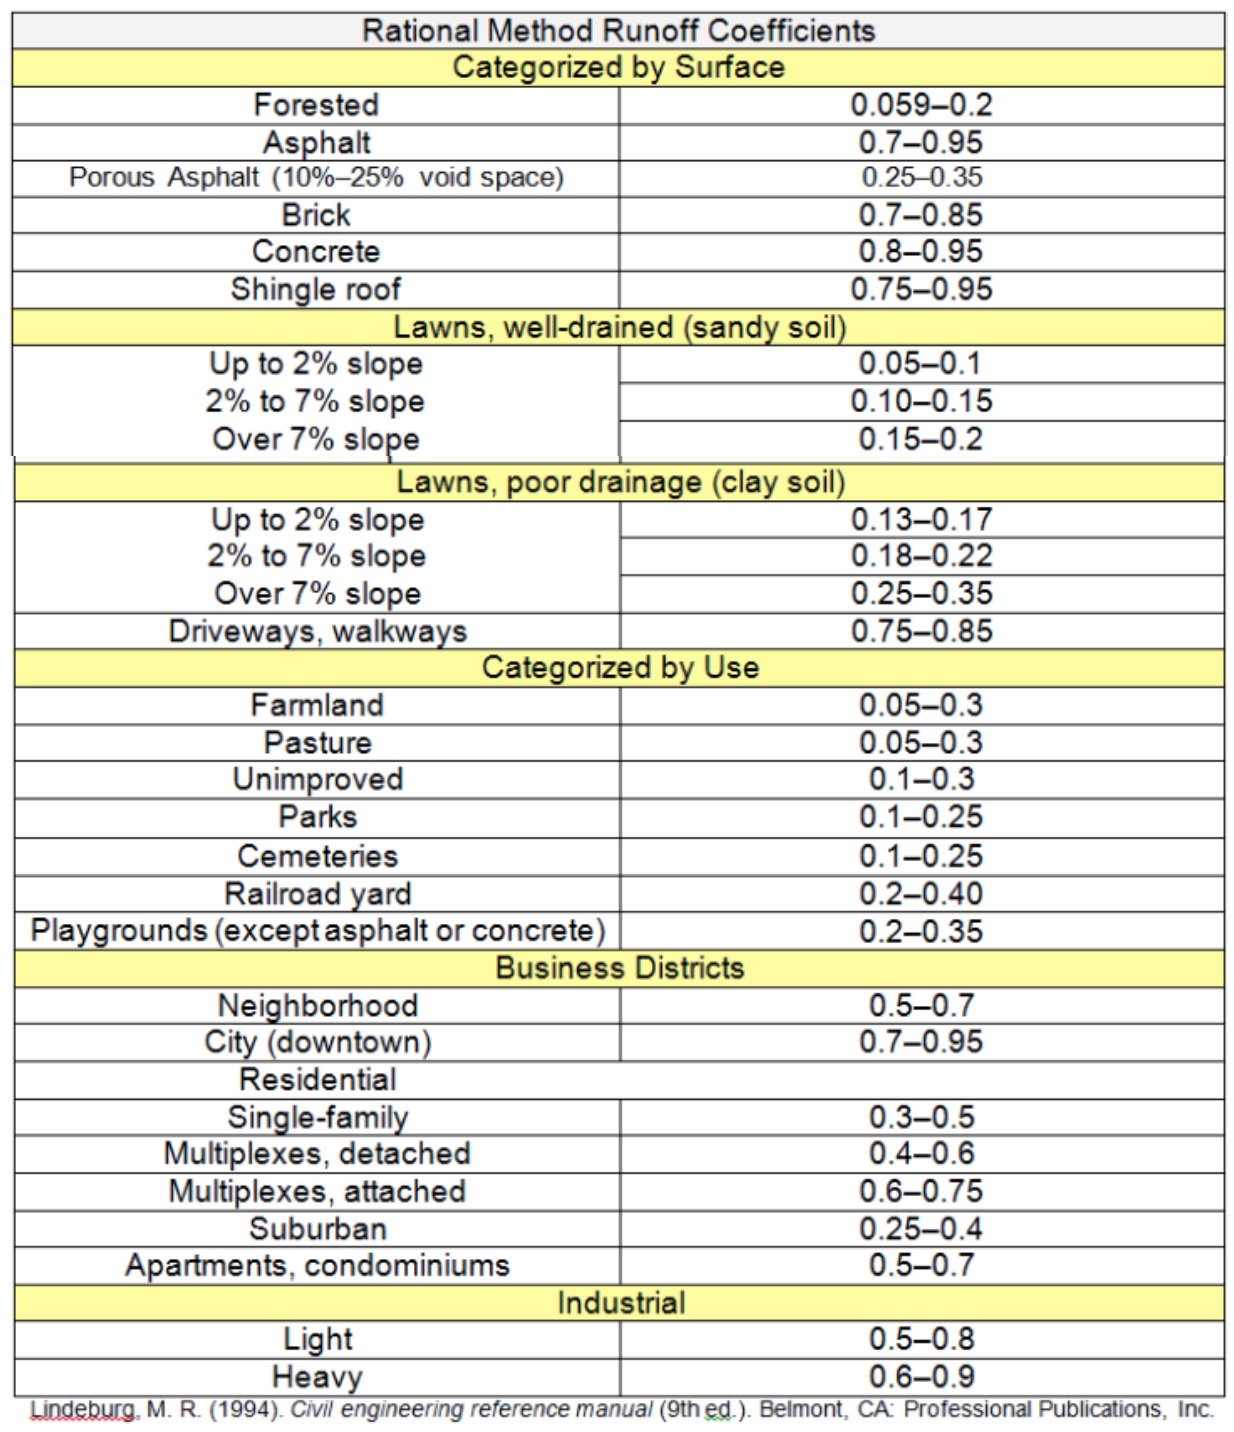
Runoff Coefficients
Our final step with the Habitat for Humanity House is to look at what happens to all the water we don’t want in the house. One thing to consider is waste water from bathrooms and kitchen facilities – this unwanted water needs to leave the building and be delivered to local sewer systems. We also need to consider stormwater runoff from things like breakup in the spring when all the snow melts, or from large rainstorms in the late summer. When a lot of water dumps on the residential site, where will it go?
The last part of this unit shows a little bit of the math it takes to calculate things like waste water drainage and stormwater runoff planning. You’ll also get the chance to do these calculations for your Habitat for Humanity house as we wrap up this unit!
GRADING & PROCESS
![]() Take a page of notes on the Wastewater presentation. Focus mostly on the math required to calculate the slope of wastewater drainage, remembering that it really is just an algebra 1 slope calculation!
Take a page of notes on the Wastewater presentation. Focus mostly on the math required to calculate the slope of wastewater drainage, remembering that it really is just an algebra 1 slope calculation!
![]() Complete the Wastewater Assignment
Complete the Wastewater Assignment
![]() Take a page of notes on the Stormwater Runoff presentation. Focus mostly on the math used when calculating total stormwater runoff, remembering that it really is just a geometry area calculation!
Take a page of notes on the Stormwater Runoff presentation. Focus mostly on the math used when calculating total stormwater runoff, remembering that it really is just a geometry area calculation!
![]() Complete the Stormwater Runoff Assignment
Complete the Stormwater Runoff Assignment
![]() Create a poster in Photoshop that shows renderings of your complete Habitat for Humanity design, including both inside and outside views.
Create a poster in Photoshop that shows renderings of your complete Habitat for Humanity design, including both inside and outside views.
Waste Water
Stormwater Runoff
Part 1 Resources
Part 2 Resources